Featured Post
Disclaimer:
This site contains affiliate links and/or third party ads. At no additional cost to you, I may receive a small fee from any purchases made from or clicks on my affiliate links, which is then used for site upkeep, supplies, or other necessities related to this site. Please consider purchasing your crochet supplies or other items using my links so I can keep providing patterns to you at no cost. Please visit my Legal page for details.
Tutorial - How to Filet Crochet
- Get link
- X
- Other Apps
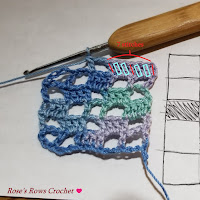
 Filet crochet is a sequence of meshes and solid spaces alternated to form a larger picture, as complex or simple as desired. The term "filet crochet" has been around since at least 1912, but this simple technique - made to mimic more complicated lace techniques and formerly called "square crochet" - has been around for much longer. It is versatile in both what you can make, and the fact that you can use nearly any kind of needlepoint graph, grid, or chart to create a filet crochet piece. You can even make your own on graph paper, or use websites like StitchFiddle to make a digital version. You can even reverse designs so that open squares are solid and vice versa for a different look.
Written instructions for filet crochet exist but they are less common than the chart form, so this post will focus on how to read and interpret filet graphs and translate them to written form. Plain mesh is pretty simple to create - typically 1 dc, 2 ch, sk 2, repeat ad nauseam, adding one double crochet at the ends of rows to finish off the last square. Filet crochet is not much different; you use 2 dc instead of 2 ch in some stitches to create the solid center, and it's the interaction of the negative-space mesh squares with the positive-space solid squares that creates images when seen as a whole. The ultimate goal here is for you to see "mesh, mesh, solid, mesh" and know automatically what it means in terms of stitches used. Less on-the-fly thinking means more fun in my opinon, so let's get started.
Step 1: How to Create Solid Filet Squares
 |
| Fig. 1 - Filet crochet solid square stitch sequences |
Another way to think about it is in terms of a repeating pattern: Each solid square is a repeating sequence of 3 dc until it either runs into a mesh square or the end of the row, so the stitch count looks like this: 5 squares * 3 dc = 15 dc, or for 56 squares it's 56 sq * 3 dc = 168 dc. When your grouping of squares runs into the end of the row, place one additional dc into the top of the last stitch (turning chain counts as the first dc) to form the final borderline at the edge. When your grouping of squares ends in the middle of a row, do not add the additional 1 dc at the end; instead, move on to the mesh stitch sequence.
Step 2: How to Create Mesh Filet Squares
 |
| Fig. 2 - Filet Crochet mesh square sequence |
Step 3: Putting It All Together
 |
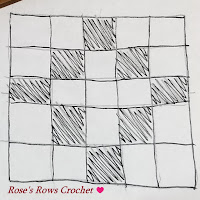
| Fig. 3 - Simple filet crochet graph for practice |
With the sequences of different kinds of squares under your belt, you are now ready to learn how to start your own filet crochet. The simple diamond pattern in this post is a good starter to get used to how it flows together, so we'll use that for this tutorial square. Filet crochet charts or graphs typically start in the bottom right corner, with the first row worked from right to left.
To figure out your starting chain, count your squares in the first chart row, multiply by the number of stitches in the sequence (3 for either solid or mesh), then add 1 ch at the end. The reason for the last dc is that the sequence always leaves the last square unfinished, so the addition is used for that purpose. As you can see in Fig. 3, it has 5 squares in both width and height. Our number for the base chain will be (5 * 3) + 1.
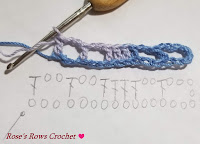
Our first square is a mesh, so we'll need to also add on our starting chain (2 chs) plus the top ch 2 of the mesh square - making your total chains 20 - and we'll put our first dc in the 8th ch from the hook (or the 13th ch from the beginning, the position of the shared dc between 1st and 2nd squares). Fig. 4 shows the first row in crochet symbols (starting tail is the short line on the left) so you can see where the chains (circles) line up. Even if you have 56 squares, your first dc will always end up in the 8th ch from the hook. If your first square were solid, you'd start like any other dc row - add 2 for your turning chain (total of 18 chs) and place first dc in 3rd ch from hook and next 2 chs, for a total of 4 dc. On subsequent rows, your inner dcs of each square will be placed either in the tops of the inner dcs of the previous row or in the ch 2 spaces, depending which square is below it.
  |
| Fig. 4 - First and second row of filet crochet in symbols |
Step 4: Beyond Basics
Filet crochet is more than just double crochets and chains. You can change it up by trying the 3-dc version (1 dc, ch 1, sk 1 for mesh, 2 dc for solid), or using half-double crochets or trebles to change the size. You can use thicker yarn as well, though be careful that thick and fluffy or busy variegated ones don't bury your design. There are also special filet stitches like the lacet stitch or long mesh. Once you feel comfortable with the basics, let your creativity soar! Any questions, or if you wish to share your creations, feel free to comment below.
*Do not repost my patterns elsewhere without my permission, for free or profit. You are welcome to post what you make from them online, but please link back to the associated pattern page. Thank you for your cooperation, and happy hooking!*
Tags:
chart
filet crochet
how to
thread
tutorial
- Get link
- X
- Other Apps
Popular Posts
Free Crochet Pattern - Thick 'n Quick Fingerless Gloves
With winter approaching quickly, what better pattern for my first post but this! These quick and easy bulky fingerless gloves with optional thumbs and mitten tips provide the warmth of a mitten, while having the option to keep your fingers free when you need them! My husband loves them. This particular pattern is made for wrist size 8-9" around, but if worsted weight yarn is used instead they may fit smaller hands (untested; feel free to leave a comment how it turned out if you try it!). They use only variations of half-double and single crochet stitches, and I have provided a list of terminology used at the beginning of the pattern. Enjoy! Difficulty: Easy to intermediate Materials: Bulky (5) yarn Size J (6.0mm) hook, or hook to match gauge Stitch markers Yarn needle (2) 1" buttons Gauge: Approx. 9 sts/9 rows per 4" in hdc Finished Size: Fits wrist circumference of 8-9" Terminology: blhdc - back loop half-double crochet...
Free Crochet Pattern - Plarn Laundry Caddy
Anyone who has ever lived in an apartment or other place that has no in-unit laundry can attest that lugging a full hamper to the laundry room/laundromat while juggling the detergent bottle and other things like coins and dryer sheets is a royal pain. What we wouldn't give for somewhere convenient to put those things so we can focus on the heavy hamper... Well, look no further for a solution, fellow laundry-luggers! This little Plarn Laundry Caddy will give you a designated space perfect for a 40-60oz detergent bottle, as well as a bit of extra room to slip in your coin pouch or dryer sheets, all without taking up space in your hamper. The pouch is also a great place to stash your clean socks or undergarments on the way back home, and when not in use you can just leave the pouch attached to the hamper until it's time to do laundry again. Ad-free printable PDF file now available for purchase on Ravelry.com! Buy now ! Difficulty: Easy to intermediate Materials: ...


Comments
Post a Comment